What Is National Pastry Day and When is It Celebrated?
National Pastry Day is a celebration dedicated to the appreciation of pastries, which are sweet or savory baked goods made from dough. It’s a day to indulge in and enjoy various types of pastries. The first ever pastries are believed to date back to ancient times when the Romans and Greeks made filo-style pastries as meals and treats. The main ingredients found in their pastries were flour, oil, and honey. Since then, pastries have come a long way with different varieties such as shortcrust pastry, puff pastry, choux pastry, Filo, and hot water crust pastry. December 9th is National Pastry Day, and to celebrate, we’re sharing a few recipes perfect for the holiday season.* Despite what you may think, homemade pastries are easy and cost-effective. So, let’s get to the recipes!
Popular Pastry Recipes for National Pastry Day
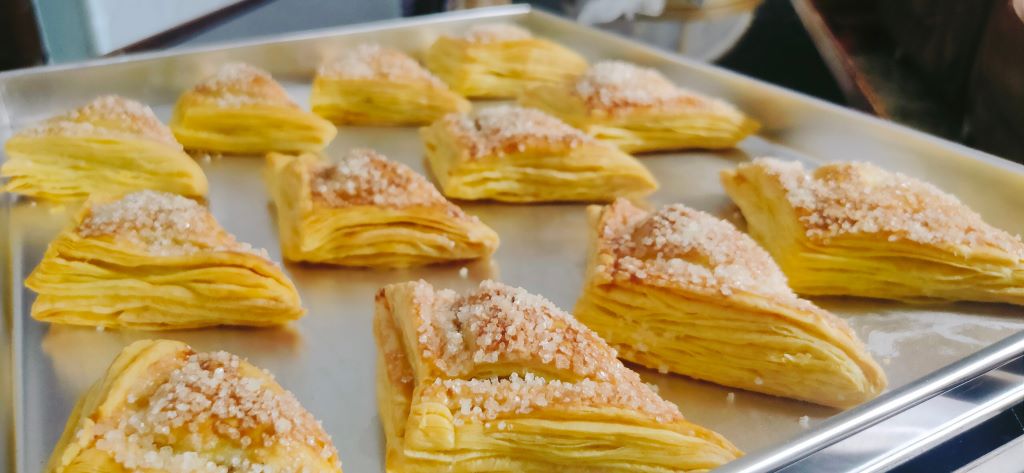
Puff Pastry (Rough Puff)
By: Tatiana Lewis
Puff Pastry is famous for its flakey, buttery layers due to the lamination process (folding and resting multiple times) when preparing the dough. Traditional puff pastry takes hours to make, but this recipe is for rough puff pastry, meaning fewer folds, less resting time in the refrigerator, and breaking up your butter into small pieces before combining it with the flour instead of incorporating it as one large slab of butter as you would do in traditional puff pastry.
Ingredients
- 1 and 1/3 cups All-Purpose flour (set aside some additional flour for dusting the surface and dough)
- 1 tsp granulated sugar
- 1/2 tsp Salt
- *3/4 cup or 1.5 sticks of butter, cold and cubed (salted or unsalted is baker’s choice). Please note it‘s essential that your butter is cold. We recommend cutting your butter into cubes and placing it back into the fridge for about 15-20 minutes; take out the butter when ready to use.
- 6–8 Tablespoons water, ice cold
This recipe should create 1 pound of dough.
Directions
- Whisk the flour, sugar, and salt together in a large bowl. Place the cold and cubed butter on top. Gently toss the flour and butter together with your hands, and then briefly rub the butter into the flour to begin combining them. This should only take 30 seconds.
- Add the ice-cold water 1 tablespoon at a time until the dough forms one large shaggy clump in your bowl. Use your hands to toss the mixture together after you add each tablespoon. As the dough begins to hydrate, you can start lightly clumping it together with your hands to help bring it together. This process will create a shaggy dough.
- Place the shaggy dough out onto a lightly floured work surface. Put some flour on your hands and start patting down the dough until it’s 3/4 – 1 inch thick, about a 5×8-inch rectangle. Fold the dough into thirds as if you were folding a business letter. Use your hands to flatten and gently smooth out any dough cracks. Then, wrap it up tightly in plastic wrap, store it in a food-safe container with a lid, and place it into the fridge.
- Refrigerate dough for at least 2 hours or up to 24 hours.
- Take the dough out of the refrigerator; if it has been chilling for longer than 3 hours, let it rest for about 5 minutes before rolling. Lightly flour a work surface. Have more flour close by because the dough will become sticky. Use your hands to flatten the dough into a small square gently.
- Roll the dough into a 6-inch wide and 12-inch tall rectangle 1/2 inch thick using a rolling pin. As you roll, it’s best to flip the dough over once or twice to ensure it’s not sticking to your work surface. Lightly flour your work surface as needed. Fold the rectangle into thirds as if it were a business letter. Turn it clockwise or counterclockwise and roll it out into 6×12 inches, 1/2 inch thick rectangle again. Then, fold into thirds again. Again, turn it clockwise or counterclockwise. You’ll repeat rolling and folding 4 more times for a total of 6 times.
- Lastly, wrap up/seal tightly and refrigerate for at least 15 minutes and up to 24 hours before using in your recipe. You can also freeze the dough and use it for a later date.
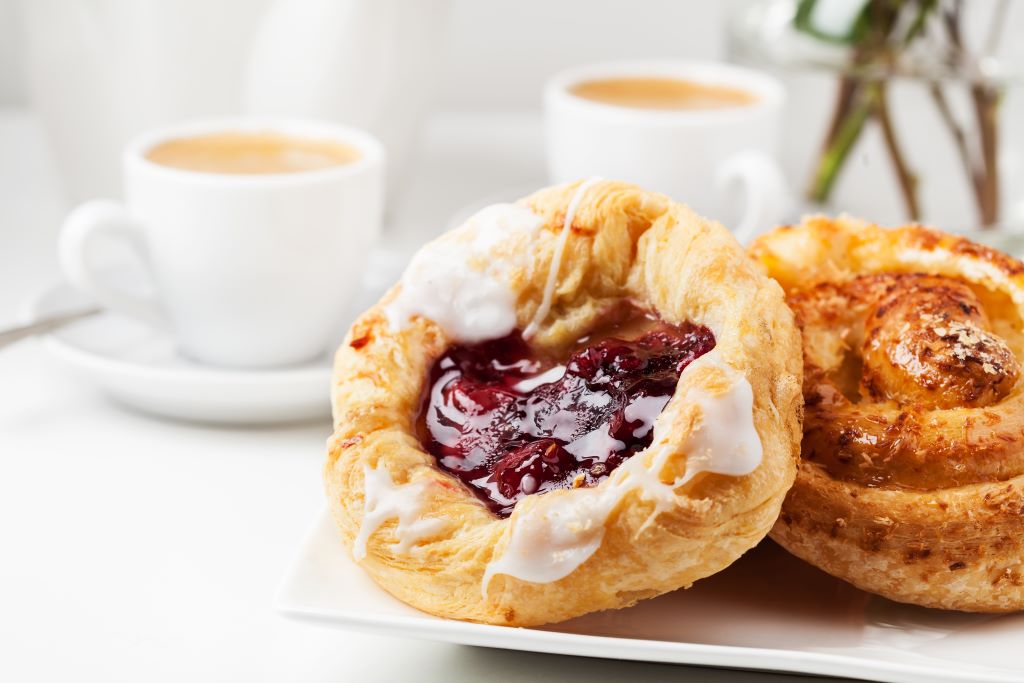
Danishes
By: Tatiana Lewis
Now that we have our puff pastry base chilling in the fridge, it’s time to start baking! Fruit-filled Danishes with decadent icing make any breakfast special. Serve them Christmas morning or the next time you’re hosting brunch.
Ingredients
- 10 ounces or 283 grams of your homemade puff pastry (if previously frozen, thaw in your refrigerator for 40 minutes. Your puff pastry should be cold but still workable)
- ½ cup of cream cheese softened
- 2 tbsp sugar, granulated or cane
- ½ tsp vanilla
- 2 tsp lemon juice- we recommend fresh, but the bottle lemon juice is still just as good.
- ¼ cup of your favorite fruit spread or jam, baker’s choice.
- ½ cup fresh sliced strawberries
- ½ cup fresh raspberries
- 2 tsp cornstarch
- 1 large egg
- 2 tsp milk (we recommend nothing lower than 2% for your egg wash)
This recipe should create 6 Danishes.
Icing
- ¼ cup powdered sugar
- ½ tsp milk (we recommend nothing lower than 2%)
Directions
- Preheat the oven to 400° F and line a large baking sheet with parchment paper.
- To make the cream cheese filling, mix the softened cream cheese, sugar, vanilla extract, and lemon juice until smooth. Use a whisk to ensure all lumps have dissolved.
- In a separate bowl, mix your fruit spread/jam of choice with the berries and cornstarch set aside.
- Dust your work surface with some flour. Unwrap your puff pastry and place it on your work surface. Coat a rolling pin with a bit of flour and roll the puff pastry into a rough 12×12 inch square.
- Slice the puff pastry halfway down the middle lengthwise using a pizza cutter or sharp knife. Slice each half into 3 rectangles widthwise, along the blended seams, to make 6 Danishes.
- Transfer the sheets onto a baking tray and ensure they’re spaced apart evenly. Use a knife to score a 1/4-inch border around the outside. This will allow the edges to rise to contain the filling. Don’t cut all the way through, just enough to leave behind a clear border.
- Then, lightly brush the edges with an egg wash. To make the egg wash, whisk together the egg with 2 teaspoons of milk and use a pastry brush to apply.
- Scoop 1 tablespoon of the cream cheese filling into the center of each Danish. The filling will be enough for 6 Danishes. Then, spread the filling within the border using the back of a spoon.
- Dollop the fruit filling into the center of the cream cheese. Spread evenly.
- Bake your Danishes on the middle rack of the oven for 20-25 minutes, until evenly puffed with golden brown edges.
- When they’re still warm on the baking sheet, brush the tops with a little extra fruit spread.
- Transfer your Danishes to a cooling rack; you want to serve them warm but not piping hot.
- Whisk together the powdered sugar and milk until it reaches a thick, glue-like consistency. If it’s too thick, add a little more liquid. If it’s too thin, add a bit more sugar. Drizzle on top of your warm Danishes.
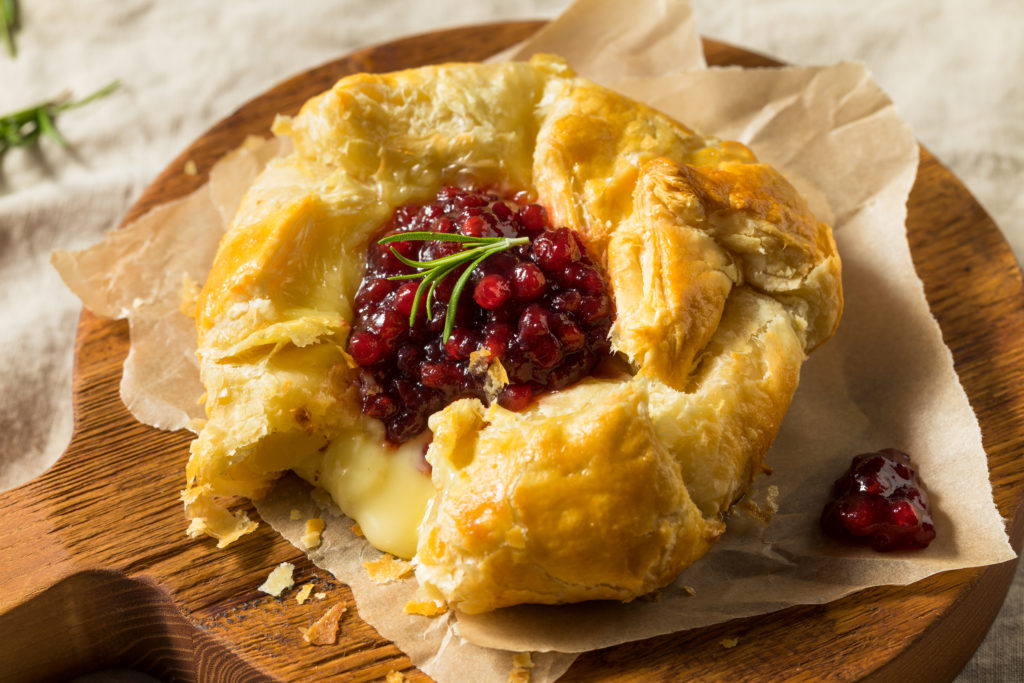
Baked Brie in Puff Pastry
By: Tatiana Lewis
This savory dish is perfect for your next holiday party. It’s so simple yet so tasty.
Ingredients
- 9 ounces or 253 grams of your homemade puff pastry (if previously frozen, thaw in your refrigerator for 40 minutes. Your puff pastry should be cold but still workable).
- All-purpose flour for dusting and rolling
- 1 Round of Brie (8-12oz.)
- 1 Egg, beaten
Directions
- Preheat the oven to 400° F and arrange your oven rack for the middle of the oven.
- Line a baking sheet with parchment paper or use a pie tin.
- Dust your work surface with some flour, then unwrap your puff pastry and place it on your work surface. Coat a rolling pin with a bit of flour and roll out the puff pastry into a rough 11×11 inch square.
- Place the round of Brie in the middle of the pastry. Optional: Top with any extra toppings. Fold the corners over the Brie, forming a neat package. Press the edges against the Brie and neaten the sides with your hands.
- Place your wrapped Brie on your baking sheet or pie plate. If the pastry has warmed and is no longer cool to the touch, place it in the refrigerator for 10 minutes or until you’re ready to bake and serve.
- Brush the wrapped Brie with your beaten egg. Ensure you get all the sides, flaps, edges, and brush as evenly as possible.
- Bake until golden brown, 35-40 minutes.
- Set aside to cool for 5-10 minutes.
- Use the parchment paper to transfer the Brie to a serving plate. If you baked it in a pie tin, you could serve your Brie in the tin, but make sure it has cooled enough to handle.
- Serve with crackers or slices of baked bread.
Baked Brie Variations
- Jam & Brie: Cover your Brie with a few spoonfuls of jam or preserves, such as raspberry, apricot, or jalapeño jelly.
- Honey & Nuts: Cover your Brie with spoonfuls of honey and toasted, chopped nuts. We recommend walnuts, almonds, or pecans.
- Cranberry Sauce: Cover your Brie with a few spoonfuls of store-bought or homemade cranberry sauce.
- Baked Apples: Slice some granny smith apples and cook with butter over low heat until soft and warmed through. Scoop on top of your Brie.
- Caramelized Onions: Slowly caramelize one sweet or yellow onion over low heat until soft and golden. Scoop over your Brie.
- Onions & Mushrooms: Caramelize one sweet or yellow onion and add sliced mushrooms in the last half of the cooking, season with your favorite herbs and spices, and scoop over your Brie.
Easy Pastry Recipes for Beginners
For beginners, recipes such as puff pastry pinwheels, fruit turnovers, or simple cinnamon rolls can be great starting points.* These recipes often require fewer ingredients and steps, making them more approachable for those new to pastry-making.
Traditional Pastries form Different Cultures
Traditional pastries vary widely across cultures, such as French croissants, Italian cannoli, Greek baklava, Indian samosas, and Japanese mochi. Exploring these traditions can add diversity to your National Pastry Day celebration.
How to Make a Perfect Flaky Pastry Crust
Achieving a perfect flaky pastry crust involves keeping ingredients cold, using the right fat (such as butter or lard), and handling the dough with care to create layers. Techniques such as folding and chilling the dough contribute to achieving flakiness.

Best Pastry Shops or Bakeries to Visit on National Pastry Day
The best pastry shops or bakeries to visit on National Pastry Day may vary by location. Research local favorites or ask for recommendations from friends and online reviews to discover hidden gems in your area.

Healthy Pastry Alternatives or Recipes
For healthier options, consider recipes that use whole grains, alternative flours (such as almond or coconut flour), and reduced sugar or natural sweeteners. You can also incorporate fruits, nuts, and seeds for added nutritional value.
What are Some Unique Pastry Flavors or Combinations?
Unique pastry flavors and combinations might include lavender-infused pastries, matcha-flavored treats, exotic fruit-filled pastries, or unexpected savory options such as bacon and chocolate. Experimenting with flavors can lead to delightful and surprising results.
As you can see, pastries are versatile with their sweet and savory combinations. These recipes are just the tip of the pastry iceberg. We hope this blog inspired you to try new things and challenge yourself. Remember, practice makes perfect. We encourage you to research more recipes and techniques.* For more pastry recipes, check out our blog for National Pie Day here. Happy Holidays and Happy Baking!
High-interest loans can be expensive and should be used only for short-term financial needs, not long-term solutions. Customers with credit difficulties should seek credit counseling. The opinions expressed above are solely the author’s views and may or may not reflect the opinions and beliefs of the website or its affiliates. Cash Factory USA does not provide financial advice.
* This blog contains links to other third-party website that is not endorsed by, directly affiliated with, or sponsored by Cash Factory USA. Such links are only for the convenience of the reader, user, or browser.